WEEK 1
The Autokey function automatically adds a key to a channel which already has one, each time the channel changes. We’ll use a simple example to demonstrate the Auto keyframe function:
Create a poly cube
Set the timeline to frame 1
With the cube selected Right-click the transform X channel in the channel box and select ‘key selected’, this adds a key to the animation timeline.
Click on the Autokey button:
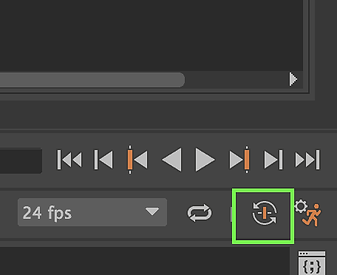
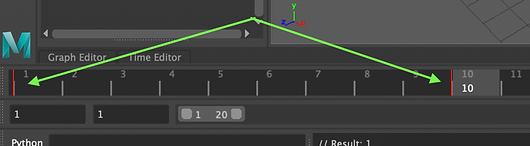
Move the timeline to frame 10
With the cube selected change the value in the transform X channel (to anything other than 0)
A new key will automatically be added to the timeline:
WEEK 2
Main Yellow Curved control is using for overall placement and to relocate animation. Could be use later if we need to re-position it.

Ball - Control Rig - Channel Box Inputs

Colour indicates state of channel, when channel is locked or accepting incoming connection such as constraint.
WEEK 3
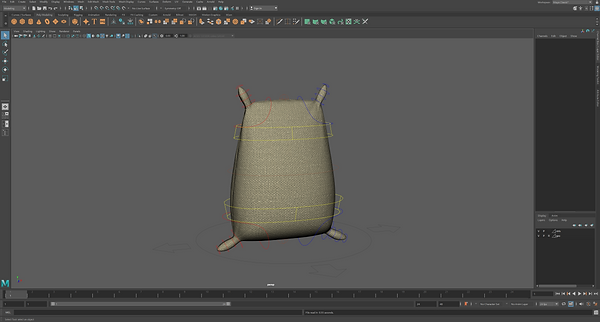
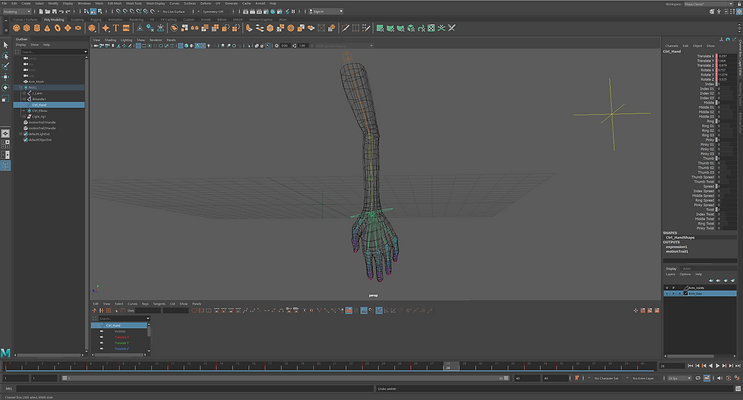
Lattice deformer, ‘Sack of flour’ and Arm Rig.


WEEK 4
This week we investigate rig in both forward and inverse ways. Base joint rig hierarchy, similar to theone we looked last week. Joints rotate (press E to rotate) in hierarchy. Firstly, we used rigged file with for both rigged kinematics.

WEEK 1

Forward VS Inverse Kinematics
FORWARD KINEMATICS:
- Compute Configuration (pose) given individual DOF Values,
INVERSE KINEMATICS:
-Compute individual DOF
WEEK 5


Assessment 1
By using rigged ball provided on blackboard I created basic bounce ball. Firstly I created grid and cube where stacked ball and where animation started. Animatiomn started with frame 1 and dropping by 2,3,4,5. Frame 6 hit the floor. Then rising up from frame 7,8,9,10 etc. Then next ball hit the floor by frames 16 and 24. By using graph in the section for animation. I fixed some issues with the ball and keep the flow more bouncy. Below there is final result.

For last I created aiSkyDoom light with downloaded sky from poly heaven website. Also, I added reflection for the ground blinn material and change material for the ball for glossy one.
WEEK 6


WEEK 6
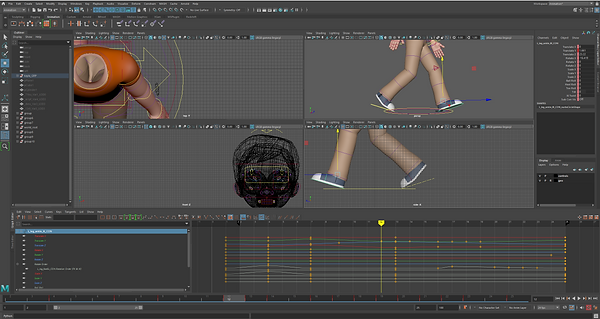
Walk. Part II.

This week we continued to investigate animation walking part with more precision using rigged maya file form blackboard. By using scene time copy and paste actual animation and then clip->matching options and select front foot and then match (Maya automatically will sign up animation to continue walk in the right timing.

As shown in the graph, we can see timeline for animation. This method is really quick and accurate to make long distance walk with copy and paste animation timeline and ad to another one with relocate and matching options.

Final animation:
WEEK 7
Animation Reference & Rotoscoping.

Eadweard Muybridge (born Edward James Muggeridge; April 9, 1830–May 8, 1904) was an English inventor and photographer. For his pioneering work in motion-sequence still photography he became known as the "Father of the Motion Picture." Muybridge developed the zoopraxiscope, an early device for projecting motion pictures.


Assessment 2
WEEK 1
The Autokey function automatically adds a key to a channel which already has one, each time the channel changes. We’ll use a simple example to demonstrate the Auto keyframe function:
Create a poly cube
Set the timeline to frame 1
With the cube selected Right-click the transform X channel in the channel box and select ‘key selected’, this adds a key to the animation timeline.
Click on the Autokey button:
Move the timeline to frame 10
With the cube selected change the value in the transform X channel (to anything other than 0)
A new key will automatically be added to the timeline:
WEEK 2
Main Yellow Curved control is using for overall placement and to relocate animation. Could be use later if we need to re-position it.
Ball - Control Rig - Channel Box Inputs
Colour indicates state of channel, when channel is locked or accepting incoming connection such as constraint.
WEEK 3
Lattice deformer, ‘Sack of flour’ and Arm Rig.
WEEK 4
This week we investigate rig in both forward and inverse ways. Base joint rig hierarchy, similar to theone we looked last week. Joints rotate (press E to rotate) in hierarchy. Firstly, we used rigged file with for both rigged kinematics.
WEEK 1
Forward VS Inverse Kinematics
FORWARD KINEMATICS:
- Compute Configuration (pose) given individual DOF Values,
INVERSE KINEMATICS:
-Compute individual DOF
WEEK 5
Assessment 1
By using rigged ball provided on blackboard I created basic bounce ball. Firstly I created grid and cube where stacked ball and where animation started. Animatiomn started with frame 1 and dropping by 2,3,4,5. Frame 6 hit the floor. Then rising up from frame 7,8,9,10 etc. Then next ball hit the floor by frames 16 and 24. By using graph in the section for animation. I fixed some issues with the ball and keep the flow more bouncy. Below there is final result.
For last I created aiSkyDoom light with downloaded sky from poly heaven website. Also, I added reflection for the ground blinn material and change material for the ball for glossy one.
WEEK 6
WEEK 6
Walk. Part II.
This week we continued to investigate animation walking part with more precision using rigged maya file form blackboard. By using scene time copy and paste actual animation and then clip->matching options and select front foot and then match (Maya automatically will sign up animation to continue walk in the right timing.
As shown in the graph, we can see timeline for animation. This method is really quick and accurate to make long distance walk with copy and paste animation timeline and ad to another one with relocate and matching options.
Final animation:
WEEK 7
Animation Reference & Rotoscoping.
Eadweard Muybridge (born Edward James Muggeridge; April 9, 1830–May 8, 1904) was an English inventor and photographer. For his pioneering work in motion-sequence still photography he became known as the "Father of the Motion Picture." Muybridge developed the zoopraxiscope, an early device for projecting motion pictures.
Assessment 2
Assessment 3
For Assessment 3 I did simple walk cycling animation using Kayla character (https://friggingawesome.gumroad.com/l/kayla-rig) I also used 3d models of trees I found online. I started my animation with keying steps and then add shoulders, elbows, wrists, create swinging hips and shoulders and on the end I added also blinking eyes. Below screenshots presents some of my development:


WEEK 1
The Autokey function automatically adds a key to a channel which already has one, each time the channel changes. We’ll use a simple example to demonstrate the Auto keyframe function:
Create a poly cube
Set the timeline to frame 1
With the cube selected Right-click the transform X channel in the channel box and select ‘key selected’, this adds a key to the animation timeline.
Click on the Autokey button:
Move the timeline to frame 10
With the cube selected change the value in the transform X channel (to anything other than 0)
A new key will automatically be added to the timeline:
WEEK 2
Main Yellow Curved control is using for overall placement and to relocate animation. Could be use later if we need to re-position it.
Ball - Control Rig - Channel Box Inputs
Colour indicates state of channel, when channel is locked or accepting incoming connection such as constraint.
WEEK 3
Lattice deformer, ‘Sack of flour’ and Arm Rig.
WEEK 4
This week we investigate rig in both forward and inverse ways. Base joint rig hierarchy, similar to theone we looked last week. Joints rotate (press E to rotate) in hierarchy. Firstly, we used rigged file with for both rigged kinematics.
WEEK 1
Forward VS Inverse Kinematics
FORWARD KINEMATICS:
- Compute Configuration (pose) given individual DOF Values,
INVERSE KINEMATICS:
-Compute individual DOF
WEEK 5
Assessment 1
By using rigged ball provided on blackboard I created basic bounce ball. Firstly I created grid and cube where stacked ball and where animation started. Animatiomn started with frame 1 and dropping by 2,3,4,5. Frame 6 hit the floor. Then rising up from frame 7,8,9,10 etc. Then next ball hit the floor by frames 16 and 24. By using graph in the section for animation. I fixed some issues with the ball and keep the flow more bouncy. Below there is final result.
For last I created aiSkyDoom light with downloaded sky from poly heaven website. Also, I added reflection for the ground blinn material and change material for the ball for glossy one.
WEEK 6
WEEK 6
Walk. Part II.
This week we continued to investigate animation walking part with more precision using rigged maya file form blackboard. By using scene time copy and paste actual animation and then clip->matching options and select front foot and then match (Maya automatically will sign up animation to continue walk in the right timing.
As shown in the graph, we can see timeline for animation. This method is really quick and accurate to make long distance walk with copy and paste animation timeline and ad to another one with relocate and matching options.
Final animation:
WEEK 7
Animation Reference & Rotoscoping.
Eadweard Muybridge (born Edward James Muggeridge; April 9, 1830–May 8, 1904) was an English inventor and photographer. For his pioneering work in motion-sequence still photography he became known as the "Father of the Motion Picture." Muybridge developed the zoopraxiscope, an early device for projecting motion pictures.
Assessment 2
Week 13
Camera’s & Shot Sequencing
This week we looked into camera settings in Maya and also add some audio to sequence timeline. By defoult camera is set up as standard 35 mm


