WEEK 1
Introduction to the week Digital Image and Introduction to Photoshop.

1. Sky replacement work flow
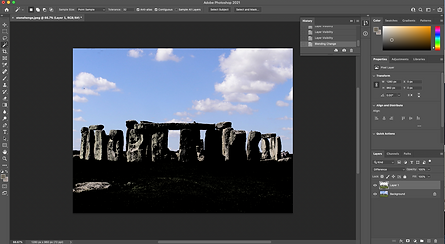
This original picture of Stonehanged has been use for replacing sky for more dramatic. There is a couple of methods we can use to arrange the final result. I used basic tools and layers shown in tutorials. I also sampled colours to get differences and by quick mask
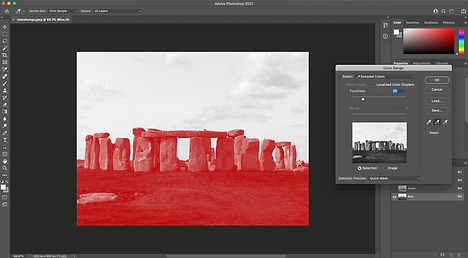
By using quick selection in the colour range I separate sky from the stones and replace the stormy sky in new layer. Later by adding colour of the stones I removed blue spots and remaining after blue sky.

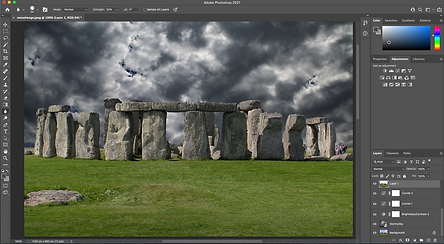
This images presents the final effect of editing using replacement in the layers.
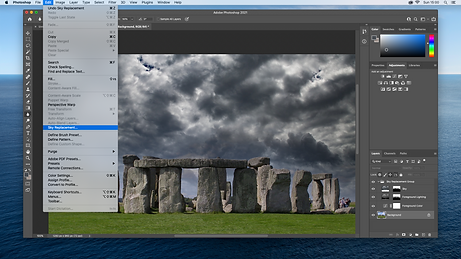
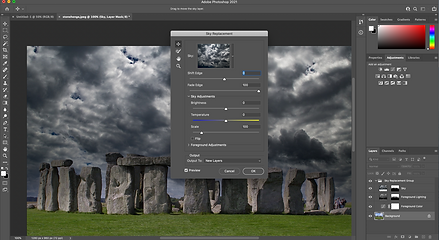
I also found more accurate way do to that by using sky replacement options found in edit -> sky replacement..


2.1. Hybrid animals
By googling free good quality pictures I choose two where hybrid looked at the same direction. To create it I started with the background image of an alligator. With using object deletion tool I gently marked head the head of the alligator, delete the background and place it over the turtle. Then adjusted the RGB curves and make soft edges over the alligator head. Because background have a similar colour I also leave the shadows and by healing tool I make this softer to give a more real look.


2.2. Hybrid animals
For second hybrid animal I spliced lizard and eagle. Firstly I separated background from the eagle. This time they were looking in different directions but by using edit, transform and flip vertical I placed beak in the similar place to match those two.


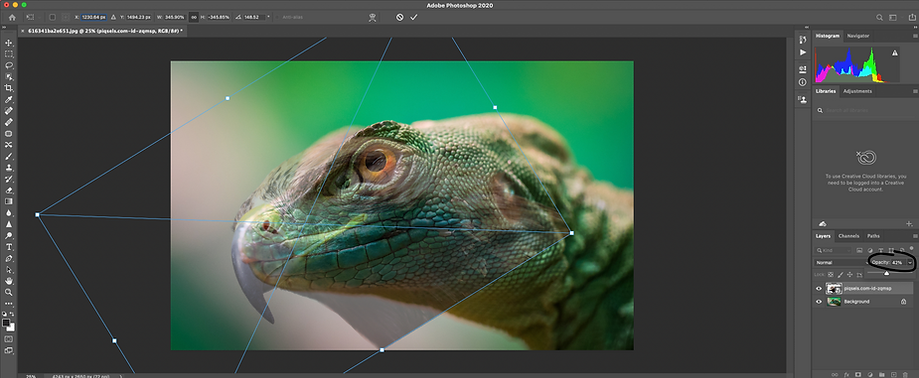
Then by using select and mask I added beak on the head of the lizard. Beak has been rotated and transform to be placed for the best possible position. Changing opacity helps to fit both pictures and matching supply mask and. Next I started paint the lizard using the eagle mask.


WEEK 2
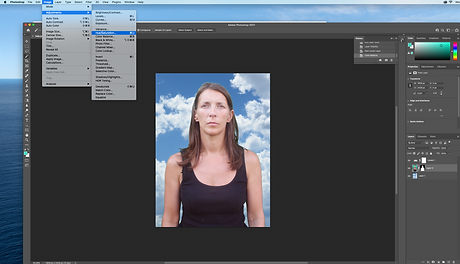
1. Green screen and Compositing Basics.


2. Exercise
In this part a green screen background from a Lady has been changed with an image of a sky. By using the colour range tool to select an outline and creating a new layer. After I used the reveal selection modifier which allow me to replace the green screen background for the the blue.


3.1Three examples of the image of the sky and rust has been used to make image of building to look apocalyptic, by replacing sky (shift + v, drag and move tool) and put in on the top of the building. Then to removes blues correctly, the colour range and select. Then by selecting a new layer, layer-> layer mask-> reveal selection.


WEEK 3
1. Fake news and introduction to Maya

Maya - 3D graphics and animation application. It is one of the basic programs of this type used in creating special effects in the film industry. It can also be used to create models for 3D games, flash animations and more. For many years, Maya had a practically monopoly on creating sophisticated special effects in the film. Initially, due to the price ($ 10,000), the program was only available to the largest film studios. Currently, thanks to a change in the pricing policy, it is available to a wider group of users. Originally developed by Alias, but owned and developed by Autodesk.


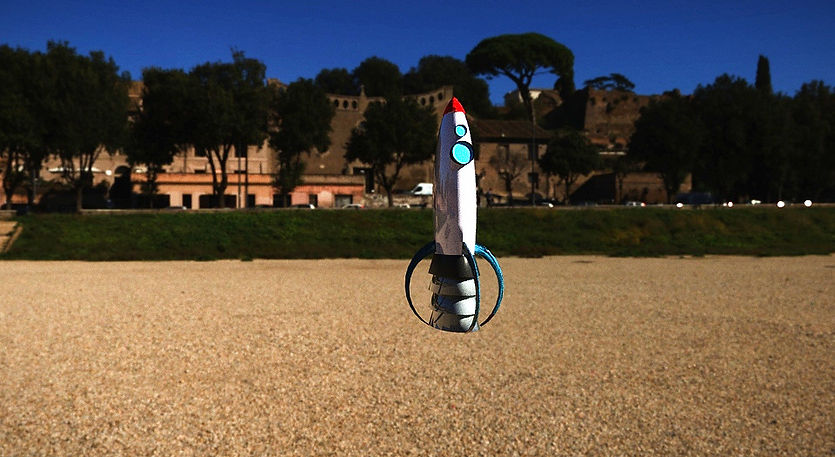
As a practice Within Maya I created my own cartoon rocket by one of the you tube tutorials provided from Maya Auto-desk channel . First I spent some time to get rocket shape by using a sphere and stretch it to get more spaceship form. Then by taking polygon cube I used attribute editor to obtain shapes. Next by clicking on cylinder polygon I created two windows. First one I use vertex and faces to places ages on the best possible way. When the tail was ready I added four wings and placed it close to the engine.


![rocket.mb_ - Autodesk MAYA 2022.2_ C__Users_Kamil_Desktop_rocket.mb --- pCube7.f[539].](https://static.wixstatic.com/media/259b65_ad5a27dbbdac47a6b7f03b1cfa537918~mv2.png/v1/fill/w_282,h_152,al_c,q_85,usm_0.66_1.00_0.01,enc_avif,quality_auto/rocket_mb_%20-%20Autodesk%20MAYA%202022_2_%20C__Users_Kamil_Desktop_rocket_mb%20%20%20---%20%20%20pCube7_f%5B539%5D_.png)
![rocket.mb_ - Autodesk MAYA 2022.2_ C__Users_Kamil_Desktop_rocket.mb --- pCube7.f[539].](https://static.wixstatic.com/media/259b65_53d3440e88904c33b4a01573290fd7af~mv2.png/v1/fill/w_600,h_323,al_c,q_85,usm_0.66_1.00_0.01,enc_avif,quality_auto/rocket_mb_%20-%20Autodesk%20MAYA%202022_2_%20C__Users_Kamil_Desktop_rocket_mb%20%20%20---%20%20%20pCube7_f%5B539%5D_.png)
![rocket.mb_ - Autodesk MAYA 2022.2_ C__Users_Kamil_Desktop_rocket.mb --- pCube7.f[539].](https://static.wixstatic.com/media/259b65_b23336640acf489186f17e6447158cd0~mv2.png/v1/fill/w_282,h_171,al_c,q_85,usm_0.66_1.00_0.01,enc_avif,quality_auto/rocket_mb_%20-%20Autodesk%20MAYA%202022_2_%20C__Users_Kamil_Desktop_rocket_mb%20%20%20---%20%20%20pCube7_f%5B539%5D_.png)
Each part of the model I coloured and put paint car in presets so gave shiny look I also added light on the right side (about 30 degrees) to gain shades on some parts of the ship. The final cartoon rocket I took to Arnold and render it.
Arnold is an advanced Monte Carlo ray tracing renderer, built to stand up to the demands of VFX and animation production. It offers a powerful, yet easy-to-use rendering experience that delivers beautiful and predictable results
For finishing I adjusted colour and pick up presets I also used a mesh for engines I found on internet. The model has been saved in jpg.
![rocket.mb_ - Autodesk MAYA 2022.2_ C__Users_Kamil_Desktop_rocket.mb --- pCube7.f[539].](https://static.wixstatic.com/media/259b65_ba70f2086cee4890ba7533446cc35169~mv2.png/v1/fill/w_629,h_429,al_c,q_85,usm_0.66_1.00_0.01,enc_avif,quality_auto/rocket_mb_%20-%20Autodesk%20MAYA%202022_2_%20C__Users_Kamil_Desktop_rocket_mb%20%20%20---%20%20%20pCube7_f%5B539%5D_.png)
2. Time to practice


This time by using techniques from the lecture. I created my own space ship. First I extrude cube and by using both faces and vertex I have been creating basic shape of the fuselage.
Later I extruded wings and inserted some more of the edge loops, bu using that I extruded some more parts on the wings to make additional shapes.

Then I started creating tail of the plane by adding two new loops edges I created tail and extruded on both sides. Next I resized it to make this object more smooth. On the last end I select object mode and smoothed the whole object.
Then I the Arnold section I added lighting and urban surface. By there I started painting the whole object first and then by clicking on separate parts I add some different colors and surface material.

WEEK 4
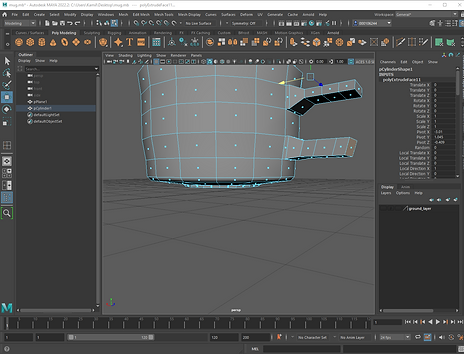
This week we worked on some basic tools with combining and connecting faces. We started with simple glass. I make glass of wine this time and later big mug.


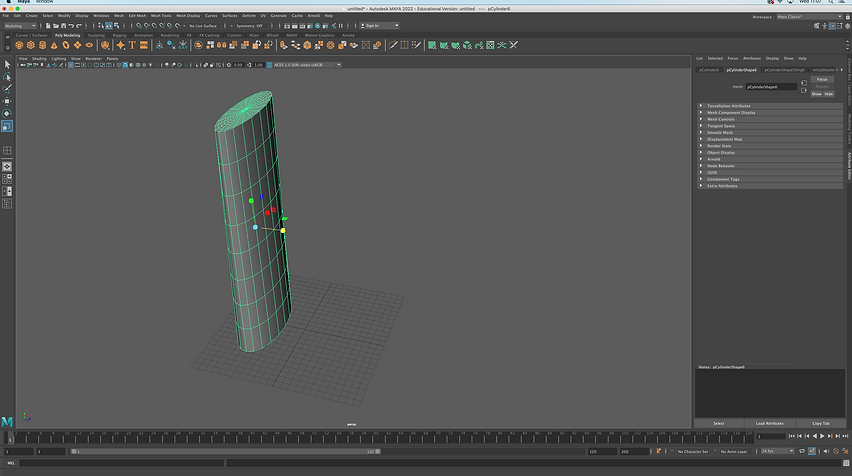
Firstly use cylinder to do rawly size of my glass later. Then I switch for faces and deleted top face. By switching for vertex and select underneath.
For the lat part of my mug I concentrate more on handle of the mug, by making few edge loops vertically and horizontally I deleted two faces and connected later with the handle by extruding corners of the handle top the mug surface.
2. Practice


With using techniques and basic knowledge from the lecture I tried a mug. First I also started with the sphere. In the attribute editor I set up size, length to obtain shape of the mug.
I changed subdivisions for 16 to later extrude the handle. Also subdivisions caps I set for 2.
Later I went for the edge mode and move down the bottom. By selecting all faces and extrude them down. Also I make few edge loops and stick them close to the bottom and the top.

From time to time I used smooth view to see If everything going well.
Then I scale the top bottom line and extrude it all the way down. By adding edge loops I created space for the handle.


The way I did handle I added some edge loops extrude them and merged them together.

Lately I concentrate on the material of the mug. By going to hypershade. I gave little bit of grey color.
I set up specular on half way and little bit of roughness as well. By checking in Arnold I set up all materials in best possible way.

WEEK 5
1. Kettle modelling and practice.

This week we practicing creating the kettle. By using CV Curve and the Revolve technique. simple we started with curve and revolved after which gives shape around the curve
To make the handle of the kettle I was selecting faces on the back and extrude them out over the curved I created. Later I bevel edges over the lid and by separating them from the rest of the kettle I smooth it as well.
After this lesson I'm felling like my skills are going better. The below images show my finished kettle.


Fake News Assignment (Due Week 8):
Images referencies:


My Fake News based on Star Wars and Terminator. Presented images I used to create this unique vision combine with Donald Trump. Those good references matched my vision to connect previous president of United States with storm-troopers during last supper.
By using magic wand, lasso and eraser tool in the editor I remove two soldiers and leave only flag of US and Donald Trump . Later I scaled and rotate to replace it in the middle of Star Wars last supper. Lately I did same with terminator. I leave only half of the face and place it into Mr. Trump face.

FINAL IMAGE:

WEEK 6
1. Lights and the AIStandardSurface


For my Bond Gadget I did electric Tesla. Bond Always have some incredible cars, so I thought it will be great. It was my first vehicle.Mostly I used techniques from lectures but some other parts are coming form my own research.
I started with references.
First by using poly cube and changing on vertex I situated vertexes with matching referencing images planes. When I get body of The car I started inserting edge loops some edges and extrude some faces.
1.2 Bond Gadget

Lately I did back of the car. By using multiple edge loops I created patterns and extrude them to give them convex shape.


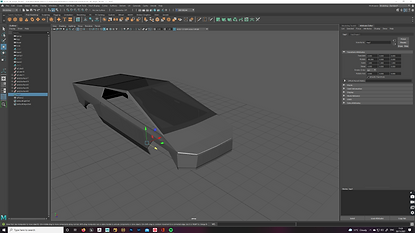
Then I started creating red lights on the back. They have 3 parts and on the last end I use hyper-shade to make glass with red reflection. Later did cover on the back and it was challenging because I bevel It and some of them needed to be done manually by inserting some extra edges.
Next I created lights by making long cube and extrude some faces in to give shape very close to the one form references. Bu using image planes I was searching to create lights similar size. Lately in hyper shade I created glass material and added to new face created for covering the main back light.


The most challenging part...


Tires took a lot of time. By my many mistakes I did them few times and these attached are the best in my opinion.
I started with cylinder and then by deleting face i left only 4 faces then by extrude them and changing vertices I started created rim. Also from time to time image plane was very useful.


Final model and 3 renders.


Render 1


Render 2


Render 3


WEEK 9
1. UV MAPPING AND PBR SHADER NETWORKS

This week we looked closer to the UV Editor. UV lays out the objects as on this sphere. In the UV Editor they can be seen as flat. All the texture will apply to 0-1 space of the UV Editor. Sometimes when modelling, U Vs become distorted. It is important minimize distortion when it comes to texturing the object.
U represents the horizontal axis and V represents the vertical axis. Each UV The image below shows how a cube in 3D space can be unwrapped into a texture in 2D space to generate a UV map.
2. The Mushroon Shape UV mapping practice.

First thing was to create a simple mushroom and then open UV editor to selected all faces the view port. Lately in the UV options menu in view section automatically was selected 4 pieces.


Lately I selected the Planar projection in the UV menu section. I selected all parts of the mushroom and position UV mapping for all faces with issues or distortions.
Due to warping in the attribute editor we can changed to Preserve Edges and Corners to remove the warping issues.
3. Brick wall and added PBR shading network (using Megascans Bridge and Mixer)

First step was creating a cube and then extend size to reach a wall shape. I also added sky-dome light in the Arnold section.
Lately I was assigning the new material to the wall and in the color option I choose the file is the albedo (jpg) image of the brick wall. Then in the texture section I resized the brick wall texture horizontally and vertically.


The next step it was going to the Hypershade setting, find the texture for the wall and then select the Graph Network. Then select brick mesh- Edit and Duplicate with Connections to Network. By pressing G I created another 5. The second texture tab i renamed specular and added specular jpg from source images. Form there in the attribute editor srgb needed to be changed on Raw and this was to removes the colour reflection in the specular image.
Another step it was to bring specular roughness. I aslo renamed texture tab and connected out alpha with specular roughness in the main tab. Same was done with bump and normal.


Last step it was to connect and create displacement. Rename texture tab as before and then tab and create a new displacement shader. I connected them together by out alpha -> displacement and top displacement shader.

WEEK 10

This week we practiced techniques of using hyper shade from last week and revising some other materials.

Next task was to create a barrel and export it as fbx on desktop and prepare it for exporting in substance painter.

Basic material of the barrel in substance painter and by creating layers making new colours.

Red barrel with metallic look and plastic barrel cork.
WEEK 13
MODELLING TIPS AND TRICKS


Using techniques for the lecture I made a simple mug.


History background:
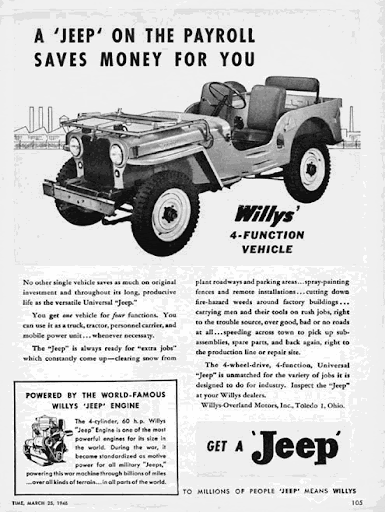
Willys MB liberated Europe from German occupation, after the war he served in the Greek army. General Dwight Eisenhower included the Willys MB among the three pieces of US Army equipment - along with the Dakota plane and the landing craft - thanks to which the Allies managed to win World War II. After the war, in 1946, the future US president even received a Willys from the Scots as a token of gratitude for keeping the Nazis away from their homes. This specimen has survived to this day.


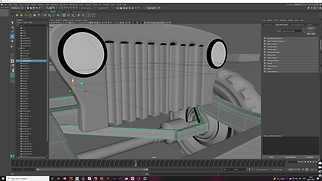
I started my model with modelling frame first. By creating few polygon cubes and place them like presented on the screen-shoot.


Lately I created tires and screw which I place them around trying to keep as original.


Next by using image planes I created body of the car and started making frame for seats and looking for potential texture I can use later.

By creating a new cube polygons and insert edge loops in the attribute editor attached them to seats and resize them to fit body of Willy MB and smooth by pressing 3 in that case the edges look more realistic.


Next by creating torus and changing radius I make steering wheel. Ring inside has been made by making another torus aand changing radius as well. Then deleted faces on the top and creating front (by fill the whole) in the mesh section. Later I extruded front face and add some an extra edge loops in the ring.


In corners of the jeep I make a corners with some rivets. Original jeep has some of them over the whole car body.

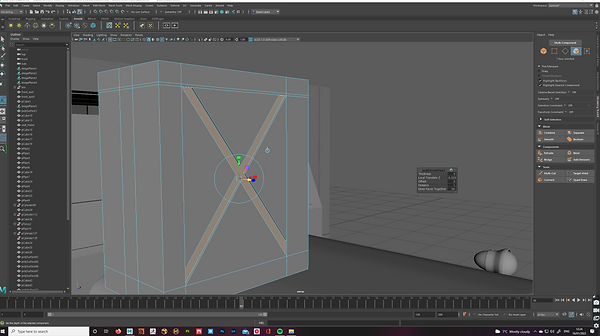
Lately I make kinda a signature of Willy Mb. Classic tank on the back of the car. By making a cube in the selection. I added an extra edge loops and in the modeling section multi-cut tool. The idea was to find X shape and then select face and extrude it inside of the tank. Later I smooth the whole object and below is the result of my ideas. I also make a handle by using pipe and tools for sculpting and pressing b and using soft selection.


The next step it was to create an axe and shovel. For axe I created handle, first by bending it with sculpting tolls in sculpting selection. lately I added wood material in hyper shade and fix uv mapping.

The last part of my model It was to create front light. I used same shape as speedometer. For the frame of lights I used. Ring in the selection and resize it and replace it ander the front grill.


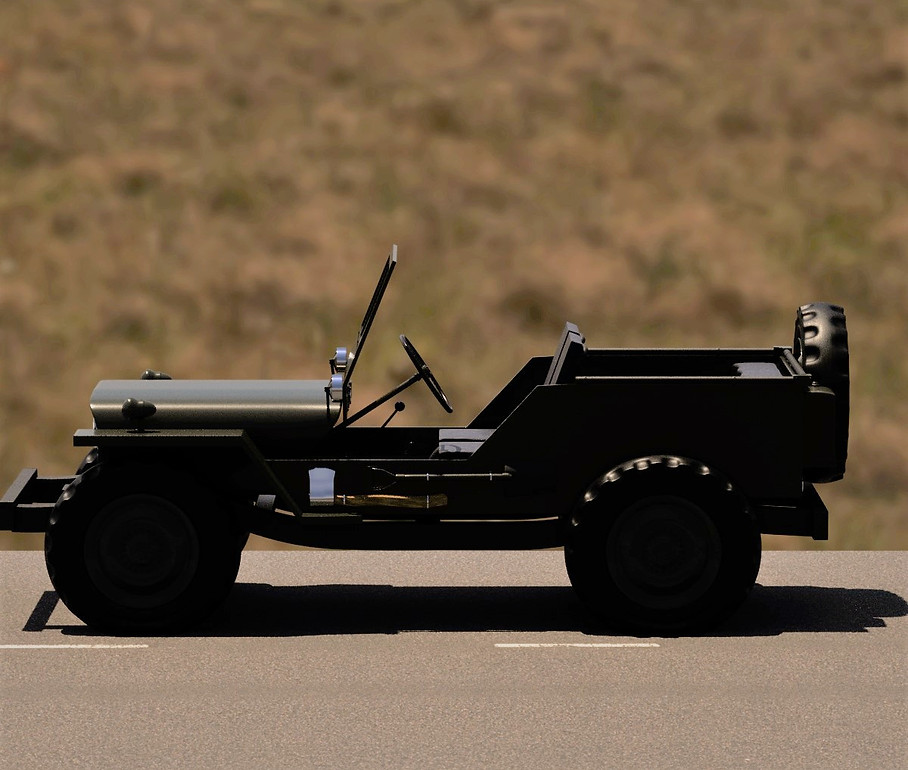
Final Render:


My NY rooftop project started with some simple old-school buildings well-known from some American feature films. I crated quiet large cube and then using multi cut + ctrl created edges around the building. Lately same has been made with windows and frames. Frames were extruded (ctrl+e). Next part it was to create realistic outdoor stairs. Resized it and replace it into the frame and attached to the building.
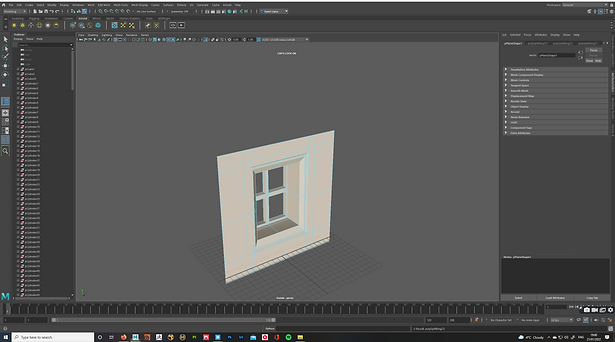
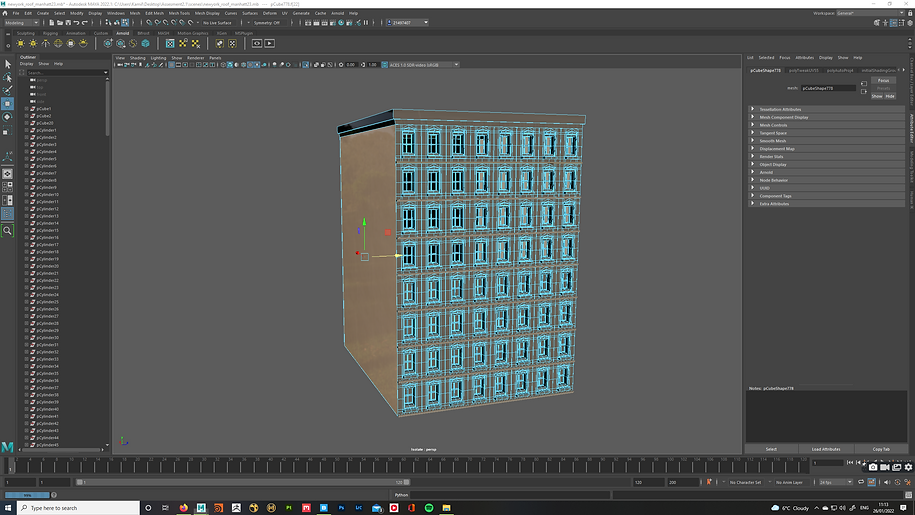
The second building I started with different technique. Firstly I made first block of the window and later duplicate it. This window was inspired by old fashioned buildings with high ceiling. To create this shape I play a lot with extrude faces.


For nearly all textures in my project I used bridge as a plugin in Maya. UV mapping was also created in Maya.
For the top of my building I used concrete floor as in my opinion was the best from what mega scans offer in their software.

The next step it was to create skyscraper. For mostly of my buildings I build fist floor and duplicate it couple of times later.


For all emergency exit of my building In add some graffiti on the top. In the UV section I resize it and replace it to fir face properly.

Tested renders:


Final Arnold Render.


